A beautifully roasted chicken is hard to beat. Add some notes of beer, even better!
This beer can chicken is full of flavor and is a breeze to make. Once the meat is over the fire, this dish is pretty much on autopilot, and you are now free to mingle with your friends and family.
If you want to make the juiciest and most flavorful chicken you’ve ever had, stick around to learn more about it or jump to our recipe below.
The Juiciest And Most Delicious Chicken You Will Ever Make
Chicken is one of the most popular proteins because it is so easy to make, affordable, and versatile. Chicken is great for day-to-day or you can make a more intricate meal for a special occasion.
Chicken is high in protein and extremely low in carbs, which is exactly what you want. Not only that, but it is much more affordable on average than beef, pork, or even turkey.
The combination of seasonings and spices in this recipe makes it extremely flavorful, and the cooking method ensures that each bite will be dripping with juices.
If you’re tired of grilled chicken that misses the mark and ends up dry and overdone, check out the recipe below to change how you look at simple poultry.

- Designed so beer can cannot fall out
- Holds traditional 12 oz beer can
- Simple to use and easy to clean
Prep Time
Before you even touch any of your ingredients, go ahead and start preheating your grill to 350 degrees. You want to let it heat up for a good 10-15 minutes so you can make sure it is nice and hot by the time your chicken is placed over the heat.
I make this beer can chicken recipe on my pellet grill (the Camp Chef Woodwind WiFi). The pellet grill has some distinct advantages for this recipe but by all means you can use any type of grill you have at home for this, whether it’s a charcoal, gas, kamado, or pellet grill.
Pellet grills are great because you can control your smoke levels, and also because the grill cooks with indirect heat, meaning you won’t have to worry about burning your chicken.
If you’re on a traditional gas grill or charcoal grill, we’d recommend that you utilize a two zone grilling set up – where you have high heat on one half of your grill and no heat source on the other half of your grate. This allows you to cook the chicken with indirect heat on a “regular” grill.
While your grill is coming up to temperature, you have more than enough time to tackle some of the prep work. Many people rinse their raw chicken, others don’t.
If you prefer to rinse your meat, now is the time to do it. Whether you do or not, make sure to pat your meat dry with paper towels before you season. This step is important because it will help get that crispy skin everyone loves.
Spice It Up
Using a pastry brush, lightly brush your chicken with a thin layer of vegetable oil. This will help the dry rub stick and aid in the browning of the skin. Combine all of the seasonings in a small bowl or ramekin. Rub down your chicken with a liberal amount of the spice mixture, ensuring that you get the cavity as well.
One technique that is used on larger birds, is if your chicken still has the skin on it, you can create a deeper richer flavor by separating the skin from the meat by sliding your hand between them and rubbing the spice into the meat under the skin.
Not only will this season the chicken, but it will allow the spices to work with the natural juices and soak into the meat. The skin will also prevent the spices from direct contact with the grill flame, which can make them taste bitter.
The seasoning blend used in this recipe is a pretty classic beer can chicken blend which includes onion powder, paprika, garlic powder, and cayenne pepper, along with a few others.
If you find that this blend is too heavy on cayenne or garlic or onion you can adjust the seasonings according to your personal tastes. Do not be afraid to use a seasoning mix or blend that you are already familiar with, go with what you know.
Beer Time
After your chicken is fully seasoned it’s time for the beer. This is a crucial step, as the name of the dish is Beer Can Chicken. You can use any variety of beer you want.
Light beer, dark beer, or even cider will result in flavorful and juicy chicken. If you don’t like beer or don’t have any on hand, you can put chicken stock or lemon juice and water in a mason jar and use that instead of the beer can.
Pop open your can of beer. You can either drink or dump ¼ of the can and then slide the can into the cavity, making sure to leave the very bottom of the can out of the chicken. You can place your chicken either on a sheet tray with raised edges or you can use a beer can chicken roaster pan, depending on what you prefer and have on hand.
As the chicken and the beer begin to heat up, the beer will begin evaporating and steaming inside of the chicken which will baste the meat while it cooks, so you don’t have to worry about dry meat.
Nearly everyone has overcooked a piece of chicken in their life, and suffering through that chewy disaster is something you will not have to worry about with this recipe.
This is the perfect recipe for those who have difficulty cooking chicken thoroughly, without drying it out. It is also a great method to try out when using a new grill that might not heat exactly as you expect.
Getting the Beer Can Chicken on the Grates
Now that you have completed all of your prep work, it’s time to cook your chicken. Head outside to your grill and with the roasting pan or sheet tray.
- If using a pellet grill or other convection style grill, place chicken on the center of your grate
- If using a two zone grilling set up, place chicken on the side of the grill without direct heat underneath the grate
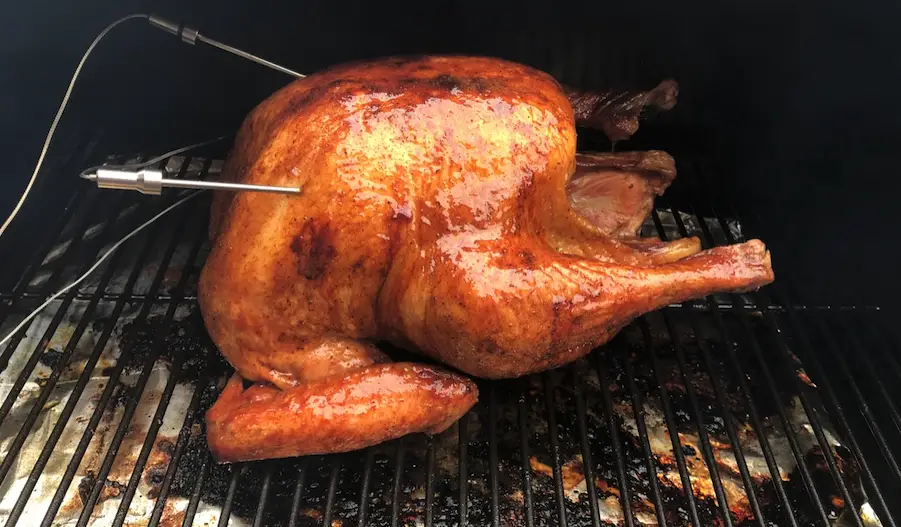
From there, close the lid. At 350 degrees Fahrenheit, the chicken should take about two hours to cook completely. Try your best not to peek at the chicken too often, no matter how tempting it might be! Each time you lift the lid, valuable heat escapes and your cook becomes a little bit more uneven.
Really though, we’re cooking until an internal temperature of 165°F is reached. This recipe is one where it’s really important to have some kind of probe thermometer handy that can measure the chicken’t internal temperature at multiple points. Check the thighs and breast – when both have reached 165°F, the chicken can come off of the grill.
Side Dishes
While you are waiting the 2 hours for the chicken to finish cooking, this is the perfect time to take care of any side dishes.
Dishes like egg salad and potato salad that have ingredients that need to be cooled ahead of time before mixing should have been made earlier in the day or the night before but if you waited it isn’t a big deal.
You can rest cooked eggs and potatoes in ice water to get them to stop cooking and to cool off completely. Some side dishes that go great with any barbecued meats, including beer can chicken, are potato salad, baked potatoes, risotto, corn on the cob, biscuits, cornbread, mac & cheese, or roasted or grilled veggies.
Beer can chicken goes great with an ice-cold beer, of course. You can choose to serve the same kind of beer you cooked the chicken with or you can go with your favorite brew.
You can also pair this dish with either red or white wine. Just be sure to choose something that goes with the flavors in your chicken. No matter what you choose to serve with your beer can chicken, your meat will be the star of the show.
Time To Carve
You know your chicken is done when a meat thermometer indicates that the internal temperature at the centermost point of the breast has reached a minimum of 165 degrees Fahrenheit.
Once your bird has finished cooking, remove it from the heat and allow it to rest for 10 minutes before you cut into it. After allowing your meat to rest, you are left with the juiciest chicken you will ever eat.
If you end up with leftovers, you can store them in your refrigerator or freezer in a plastic container, plastic bag, or wrapped in foil or plastic wrap.
You can eat the leftovers like you did when the chicken was fresh, you can make sandwiches, or you can shred the meat and make tacos, BBQ, or chicken salad. One of the bests things about cooking the chicken like this is that it easily stands up to reheating without drying out.
Beer Can Chicken Variations
This recipe here is a traditional dry rub that many people use for their beer can chicken. If these seasonings aren’t your favorite, there are a couple of variations you may like.
One thing many people choose to do is a BBQ rub that contains brown sugar and seasonings such as garlic, onion, and paprika. Another option would be a cajun rub, or even using a seasoning blend such as Old Bay.
For the beer, you can use your favorite IPA, stout, a hard cider, or you can swap the beer for a mason jar half full of chicken stock, apple cider, or lemon juice and water. Some people even drop a couple of garlic cloves down into the liquid before they put it inside of the chicken.
For easier adaptation to indoor cooking, or for use during winter months when your grill might not be accessible, there is a spatchcock variation.
There you’d spatchcock the chicken and lay it flat in a roasting pan and pour the beer or other cooking liquid into the pan as well. This way the chicken roasts in its juices and the beer aromatics are also infused into the meat.

Beer Can Chicken on the Grill
Equipment
- Beer can chicken roaster pan or stand
Ingredients
- 1 whole chicken 3-5 lbs
- 1 can beer pilsner, IPA, etc.
- vegetable oil to lightly coat chicken
Rub Ingredients
- 1 tbsp ground black pepper
- 2 tbsp paprika
- 2 tbsp kosher salt
- 2 tbsp onion powder
- 1 tbsp cayenne pepper
- 1 tbsp ground cumin
- 2 tsp dried thyme
- 2 tsp dried oregano
- 2 tsp garlic powder
Instructions
- Preheat your grill to 350°F
- Rinse chicken under cool water then ddry the outside of the chicken with a paper towel
- Lightly coat chicken with a thin layer of vegetable oil
- Mix all rub ingredients together in a small bowl
- Rub chicken down thoroughly with rub mixture, season liberally and ensure that you season the cavity
- Open the beer can and pour out (or drink) 1/4 of the beer. Place the opened beer can in the cavity of the chicken, with the very bottom of the can sticking out
- Place chicken on a sheet tray with raised edges. You can also utilize a beer can chicken roaster rack instead of a sheet tray.
- Place sheet tray with chicken onto the center of the cooking grate and cook for approximately 2 hours.
- The chicken is done once it reaches an internal temperature of 165°F in the centermost point of the breast, regardless of how long it has been on the grill.
- Allow it to rest for 10 minutes. Carve, serve, and enjoy!
Notes
Nutrition
Final Thoughts
This beer can chicken recipe is a classic that’s easy enough to throw on the grill. The flavors and tenderness are sure to impress your crowd, and it’s a perfect fall time recipe and even goes great at a tailgate or game watching party.
Did you try out our recipe? How did it turn out?
Discover more from Own The Grill
Subscribe to get the latest posts sent to your email.